Monday, 26 April 2021

Slant Board

The ‘Knees over toes guy’ has had a quite the rapid rise in views this year and I certainly took notice given my own struggles with knee pain. I’ve watched nearly all of his YouTube videos trying to gain an understanding of his exercises and methods, and have started to implement them into my own training. In particular I liked the look of his revers set up progressions, as I know this type of movement can be a trigger for my knee pain. I started with a very small range of motion step forward, then stepping off a low box, which he calls a ‘Patrick step up’. The next progression for me was carefully increasing the reps to where I am now performing 5 x 20 reps each side 3-4 times per week. I will continue this for several weeks before moving on to the next progression which is the ‘Poliquin Step up’
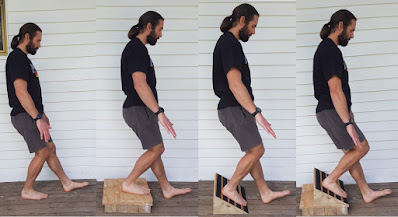
Some basic progrssions.
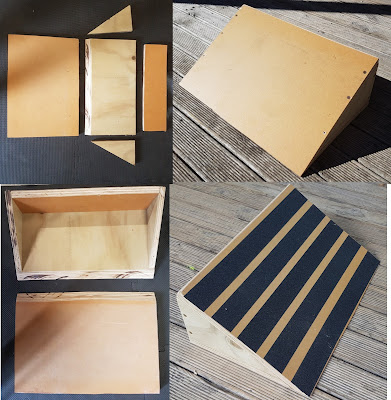
The Poliquin step up requires a slant board, which I didn’t have, and would be prohibitively expensive to import (to New Zealand) so I decided to build my own. I wasn’t sure what the best dimensions were, so that was the first thing to figure out. Ideally, I would have built it as wide as my powerlifting cage would allow, but a better option was 500mm wide so that I could stack it on top of my lifting blocks. It needed to be slightly larger than my size 11 feet/shoes so 300-350mm would be more than large enough for the top. The angle was the next question. A full 45 degrees is much too steep, so I was considering 22.5 degrees (half of 45 degrees) until I saw in a video Ben Patrick (the knees over toes guy) said it was about 30 degrees. Having built it, this does feel about right, however I also think 22.5 degrees would feel fine too it that’s all you can manage.

I wish I has access to the right skills and tools to be able to draw all of the parts out on paper, measure, cut and assemble everything, and have it come out perfectly, but I don’t. To work around this, I cut the boards in stages. Using 20mm plywood I cut the top first with the angled cut facing down (because it looks terrible due to my lack of ability with a skill saw). I then cut the back of the slant board at the correct angle, so that I could measure and cut the bottom to size (this saved by having to use trigonometry, I can, I just can’t cut accurately enough). Then finally I could place these boards together and trace the triangle for the sizes (again saving me doing trigonometry).

Everything was screwed together and given a good over all sanding to make it all look good. I taped strips of sandpaper tape for grip (also known as grip tape) and the board is done.

I’ve used the board in testing a little bit and it feels good, and very solid. Hopefully this can be of some help to others who are looking at the knees over toes videos and would like to get into some of the exercises.
Sunday, 18 April 2021

Mace and Indian clubs

Indian clubs and maces are an ancient training tool that has seen a recent resurgence. This is due not just to the cool factor, but their use in shoulder strength and mobility training. In full disclosure I haven’t quite worked these into my training since I’m always short on time; however I would like to work them in as a shoulder warm up/full workout.

To build the maces and clubs I bought two cheap spin-lock barbells on sale. I bought a 5ft and a 6ft with the plan to cut them down for two Indian clubs and a mace or two. I took them to the engineering shop next to work where they cut the bars down to 2x 590mm, 1x1000mm and 1x1200mm. They then welded some round stop ends to prevent the bar from slipping out of my hands when using them. I gave these a quick coat of silver zinc and my new Indian clubs and maces were ready to go.

Note the round stop end for the grip and spinlocks for the weights.
I chose the sizing based on an estimated size for the Indian clubs and the length for the longest mace. The longest mace is sized similar to the Shoulderrok so the the weight lands below your butt when swinging it. The shorter mace could run into your butt while swinging, but that's just how the sizing worked out.

You could adjust the position of the weight closer to the hands.
This worked out as an incredibly cheap way to get four plate loaded clubs/maces that wouldn’t see a huge amount of use. I wouldn’t suggest this for a commercial setting, but I also don’t see myself using these for more than a few short minutes a few times per week a most. For details on exercises to perform I would take a look at bodytribe on Youtube.

Sunday, 11 April 2021

More rolling plate storage

When I found myself with a little spare cash and a yearning for dumbbells I decided to get the most practical option I could for my gym. I settled on Olympic, plate loaded dumbbells which could be loaded up to 45kg each. Plenty of weight on a dumbbell for me, and I could also use the weights on my barbells if I wanted to. Note: I don’t use these often in my training, but they have been very handy for some weighted single leg training and were worth the investment for me.

I bought 80kg of 5kg plates, 16 in total for the times I would need to load up both dumbbells and I needed somewhere to store them. My previous rolling storage rack didn’t have the room but was a great design for my needs so I decided to replicate it.

I measured the height of the plates when stacked on top of each other, and the overall width of plates for the dimensions of the base. I used some scrap 20mm plywood for the build. The base is 510mm x 250mm. The sides are 90mm high, measured to just touch the radius for the plate for a snug fit. The rollers are the same as the previous rack, 4 wheels at $5 each rated to 40kg.

This was a very straight forward build, and it allows me to push the plates out of the way under a shelf when not in use. Keeping a tidy gym is important especially in a small space so getting weights off the ground and easily movable goes a long way. It is my strong suggestion to keep your training space tidy to make that element of training as easy as possible.