Saturday, 15 May 2021

Mangaehuehu Hut

I had hiked passed this hut once before, and ran past it twice, but never stayed at it. So when I was looking for short hike to do somewhere around Ruapehu this was an easy choice. DoC lists this as a 6.8km, 3 hour hike to a hut on the Southern side of Mt Ruapehu (elevation gain is approximately 400m each way). The hut is a standard 18 bunk hut, complete with a fire place.

I left Auckland just after 7am, knowing I would arrive to the car park at roughly 12am. One of the reasons I chose this hut to hike to is if I arrived there and the hut was full, I could still double back to Blyth or Lipton hut, with daylight to spare (just). The walk is roughly half beech forest and half open tundra. Starting at the car park on Ohakune Mountain Road, the walk takes a small climb to Rotokawa, a small alpine Tarn with a great view of the mountain before dropping down to Waitonga Falls. Until this point the tracks are beautifully maintained as see a lot of tourist traffic to and from the falls. After the falls is when the tracks become more rugged. They are reasonably well marked and maintained, but would be describes as ‘technical single track’.

A wide boardwalk around Rotokawa

Only a few minutes after the falls comes the only significant un-bridged river crossing, and it is only ankle deep. When the water is low it is a simple process to keep your feet dry crossing on rocks. If the water is high you can still mange this, but it might be safer to just deal with wet shoes. From here the track climbs to the turn off to Blyth and Lipton hut, or on towards Mangaehuehu.

Swing bridge and single track/ boardwalk.

The track continues though Beech forest with a couple of single person swing bridges switching between boardwalks and single track with frequent views of the Mountain. The walk is a fairly easy stroll with no major climbs so it’s very enjoyable.

The hut sneaks up on you and pops out from around a corner with an excellent view of the mountain. The hut was warm and cosy (with the fire going), and had everything one would expect from a standard DoC hut. I prefer this style of hut, where the majority of beds are in the main section of the hut with the fire place, it’s less private, but I enjoy sleeping near the fire when it’s cold.

Can just see the corner of the hut
The round the mountain track, which this hut is a part of, see very few visitors per year, so this isn’t a particularly busy hut, despite it only taking me 2 hours 15 to hike in. I’m very keen to hike to this hut in winter, so stay tuned for a winter hike report.

The view from the hut in the evening.
The hike out is the same but in reverse, the only “strenuous” section would be the stairs up from the Waitonga Falls. The Around the Mountain (Ruapehu) track is my favourite track I’ve done so far, so this track is one I highly recommend. 

Monday, 26 April 2021

Slant Board

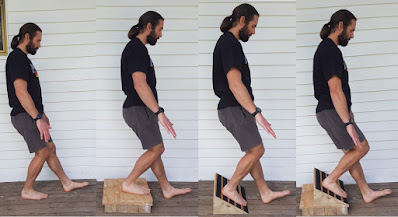
The ‘Knees over toes guy’ has had a quite the rapid rise in views this year and I certainly took notice given my own struggles with knee pain. I’ve watched nearly all of his YouTube videos trying to gain an understanding of his exercises and methods, and have started to implement them into my own training. In particular I liked the look of his revers set up progressions, as I know this type of movement can be a trigger for my knee pain. I started with a very small range of motion step forward, then stepping off a low box, which he calls a ‘Patrick step up’. The next progression for me was carefully increasing the reps to where I am now performing 5 x 20 reps each side 3-4 times per week. I will continue this for several weeks before moving on to the next progression which is the ‘Poliquin Step up’

Some basic progrssions.
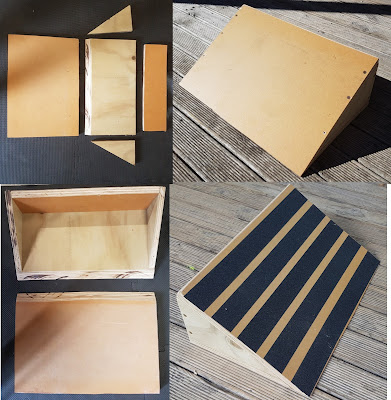
The Poliquin step up requires a slant board, which I didn’t have, and would be prohibitively expensive to import (to New Zealand) so I decided to build my own. I wasn’t sure what the best dimensions were, so that was the first thing to figure out. Ideally, I would have built it as wide as my powerlifting cage would allow, but a better option was 500mm wide so that I could stack it on top of my lifting blocks. It needed to be slightly larger than my size 11 feet/shoes so 300-350mm would be more than large enough for the top. The angle was the next question. A full 45 degrees is much too steep, so I was considering 22.5 degrees (half of 45 degrees) until I saw in a video Ben Patrick (the knees over toes guy) said it was about 30 degrees. Having built it, this does feel about right, however I also think 22.5 degrees would feel fine too it that’s all you can manage.

I wish I has access to the right skills and tools to be able to draw all of the parts out on paper, measure, cut and assemble everything, and have it come out perfectly, but I don’t. To work around this, I cut the boards in stages. Using 20mm plywood I cut the top first with the angled cut facing down (because it looks terrible due to my lack of ability with a skill saw). I then cut the back of the slant board at the correct angle, so that I could measure and cut the bottom to size (this saved by having to use trigonometry, I can, I just can’t cut accurately enough). Then finally I could place these boards together and trace the triangle for the sizes (again saving me doing trigonometry).

Everything was screwed together and given a good over all sanding to make it all look good. I taped strips of sandpaper tape for grip (also known as grip tape) and the board is done.

I’ve used the board in testing a little bit and it feels good, and very solid. Hopefully this can be of some help to others who are looking at the knees over toes videos and would like to get into some of the exercises.

Sunday, 18 April 2021

Mace and Indian clubs

Indian clubs and maces are an ancient training tool that has seen a recent resurgence. This is due not just to the cool factor, but their use in shoulder strength and mobility training. In full disclosure I haven’t quite worked these into my training since I’m always short on time; however I would like to work them in as a shoulder warm up/full workout.

To build the maces and clubs I bought two cheap spin-lock barbells on sale. I bought a 5ft and a 6ft with the plan to cut them down for two Indian clubs and a mace or two. I took them to the engineering shop next to work where they cut the bars down to 2x 590mm, 1x1000mm and 1x1200mm. They then welded some round stop ends to prevent the bar from slipping out of my hands when using them. I gave these a quick coat of silver zinc and my new Indian clubs and maces were ready to go.

Note the round stop end for the grip and spinlocks for the weights.
I chose the sizing based on an estimated size for the Indian clubs and the length for the longest mace. The longest mace is sized similar to the Shoulderrok so the the weight lands below your butt when swinging it. The shorter mace could run into your butt while swinging, but that's just how the sizing worked out.

You could adjust the position of the weight closer to the hands.
This worked out as an incredibly cheap way to get four plate loaded clubs/maces that wouldn’t see a huge amount of use. I wouldn’t suggest this for a commercial setting, but I also don’t see myself using these for more than a few short minutes a few times per week a most. For details on exercises to perform I would take a look at bodytribe on Youtube.

Sunday, 11 April 2021

More rolling plate storage

When I found myself with a little spare cash and a yearning for dumbbells I decided to get the most practical option I could for my gym. I settled on Olympic, plate loaded dumbbells which could be loaded up to 45kg each. Plenty of weight on a dumbbell for me, and I could also use the weights on my barbells if I wanted to. Note: I don’t use these often in my training, but they have been very handy for some weighted single leg training and were worth the investment for me.

I bought 80kg of 5kg plates, 16 in total for the times I would need to load up both dumbbells and I needed somewhere to store them. My previous rolling storage rack didn’t have the room but was a great design for my needs so I decided to replicate it.

I measured the height of the plates when stacked on top of each other, and the overall width of plates for the dimensions of the base. I used some scrap 20mm plywood for the build. The base is 510mm x 250mm. The sides are 90mm high, measured to just touch the radius for the plate for a snug fit. The rollers are the same as the previous rack, 4 wheels at $5 each rated to 40kg.

This was a very straight forward build, and it allows me to push the plates out of the way under a shelf when not in use. Keeping a tidy gym is important especially in a small space so getting weights off the ground and easily movable goes a long way. It is my strong suggestion to keep your training space tidy to make that element of training as easy as possible.


Sunday, 28 March 2021

Lifting blocks

A Reduced range of motion deadlift.
A few years ago, I was training a younger, but very tall athlete and wanted to shorten the range of motion of their deadlift to work on form in a little easier position. The best way to manage this is to place the plate up on lifting blocks. This makes it easier for the lifter to get into potion if they are tight, and can also make the position a little easier to learn.

The top of the blocks are 18mm plywood, 500mm x 500mm. These are screwed to 75mm square posts I had left over from an old fence. Since I don’t plan on using these for very heavy pulls I’m not worried about damaging the plywood. However if you want to build something like this for heavy pulls the only change I would suggest is covering the top plywood in some rubber gym mats.

Top and side view

These are also quite handy for single leg work like step ups and for exercises like the Jefferson curl. I’m glad I built them, even if it seems like they might have limited use, I end up using one every week.
Example of with and without blocks
And that's it, if you have some scrap plywood and timber laying around consider building some blocks if you don’t already have something similar.

Sunday, 21 March 2021

Rolling board/sliding board

This piece of equipment doesn’t need an explanation so I’ll keep this brief. When performing natural hamstring curls inside my house I was able to use a cloth or sock to slide against the vinyl flooring. However, when I shifted this exercise and workout into the garage gym this method wasn’t going to work. The other option most people use is furniture sliders, but they wouldn’t work on the concrete either.

I decided that setting up a small rolling board would be the best option. The wheels were only a few dollars each and hold 20kg + each. The off cut of plywood is approximately 200mm x 200mm. All four wheels can spin a full 360 degrees (I don’t suggest the wheels that lock in place).

This board works perfectly for the natural hamstring curls, and would probably work well for ab rollouts and other exercises too, though I only use it for the hamstring curls.

You don’t have to let a change in environment dictate what exercises you can and can’t do. Adapt as necessary.

Sunday, 14 March 2021

Yearly themes

We all know New Year’s Resolutions suck. I don’t need to explain why picking an arbitrary date in the future (the first of January), isn’t a great way to make a lasting change to your life. Nor is it a good idea to set a big goal for the year, which will take most of the year to achieve. It’s too hard to track progress, stay on track, and finally to actually complete a goal. It had been my goal for several years in a row to complete 5 sets of 5 pistol squats. But every year I would get side tracked, not put in the work required, and would eventually ‘fail’ at my goal. (Note: goals are very important but they need to be SMART – see Chris Duffin’s video for more)

The question then stands “What to do instead of New Year’s Resolutions?” I stumbled upon a good alternative, without quite knowing what I had two years ago. Having listened to a lot of the Jocko podcast, the term “Get it done” embedded deep in my mind. I felt like that would be the perfect ‘phase’ for my year. My daughter was about 6 months old at the time and I was trying to find/create a new routine for myself. The particular issue I was having was that I would leave small jobs un-done, leaving them to be done in a rush at a less ideal time. I wanted to get into a routine of doing the dishes, washing, packing my lunch and generally cleaning/tidying in the evening before bed, so all jobs were done before the morning. Sounds simple enough, but how’s the resolution to “be more organised” going for you? Not well I suspect. A much more useful option for me was to say in my head “get it done”, it sounds so simple, and yet it was extremely effective. It was also helpful to bring me back on the path when I slacked off.

After the first year of having a yearly “phrase” I discovered why this worked so well. I had inadvertently been using a yearly theme. CGP grey explains why a yearly theme is so beneficial in his video here, and it is well worth watching.

Some of the non-fiction

And some of the fiction

Given the successes of 2019’s phrase, my phrase for 2020 was “Put in the work” (again inspired by the Jocko podcast). To me this separated out into two parts of my life to focus on. The first was my workouts; I struggled to get my workouts on track in 2019. In 2020 I wanted to get back to regular workouts, and in particular to build up my strength endurance for gymnastic bodies (I’ve written before about my workout plan). So “put in the work” got me out into the gym getting my workout in, especially the extra volume. The second part of this phrase was for me to do more reading in 2020 (Covid really help out this goal). Originally, I had planned to read 12 books (Setting a number on a goal like this generally isn’t particularly helpful), and I eventually read 52 books that year. There was a mix of young adult (The Mortal Engines quartet was my favourite) and general non-fiction (‘When breath becomes air’ was so powerful and beautifully written that when I finished it I when straight back to page 1 and started reading again).

This year’s phase/theme is “Do all then things” (Odd I know, but it speaks to me and that’s the important part). This (hopefully) builds on the success of the previous two years. I want to get back into being efficient and getting things done around the home, and continue the progress I made in my workouts. I also what to build on the work I put in reading so widely, by beginning writing again (so far so good). I love to hear if this post helps you come up with a yearly phrase or theme, and later how you go with it.